Once you have created a simple page (or post) you will want to be able to add headings, set bold text and so on. We use an editor called TinyMCE Advanced which defines the icons on the editor toolbar you can use for basic formatting.
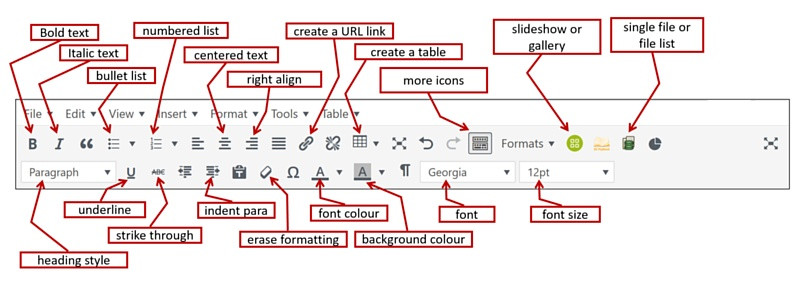
The toolbar with notes about the most commonly used icons is show below – it is similar to Microsoft word Or Open Office Writer in how it works.

To use the toolbar icons select a piece of text and click on the appropriate icon. Some of the icons apply to the whole line rather than the selected text, for example: heading style, centre/right align, indent paragraph, bullet and numbered lists.
Inserting Pictures
Read the guide on Pictures and Slideshows for storing pictures and adding pictures to the page.
If you want to control the layout of your pictures so that they are to the left or right of a block of text we suggest you insert a table into the page. Use two columns, as many rows as you want but don’t worry if you don’t create enough rows you can add another row using the table icon on the toolbar or by clicking in the right hand cell of the last row and pressing the Tab key.
|
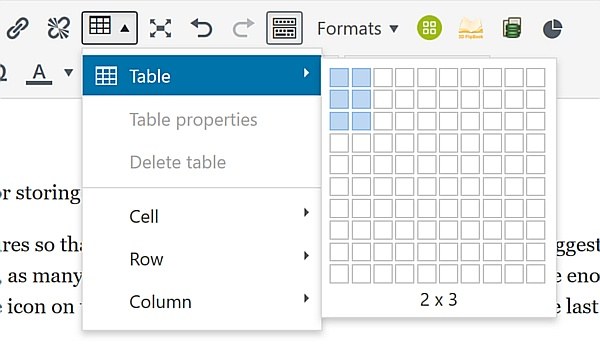
To insert a table click on the Table icon on the toolbar, hover over the table row to see a layout grid and hover the cursor over the bottom right hand cell you want to include as shown here. Click on this last cell and an empty table will be inserted in your page. Click in each cell and add content, text, pictures of anything else. |
 |
You will find that table cells align vertically in the middle by default in the editor (on the viewed page they will be top aligned). To align the text at the top of a cell click in the cell use the Table icon and select Cell -> Table cell properties and in the dialog window change the value in the bottom right V Align drop down list to be Top.
You can change most formatting aspects of the table, rows or cells using the Table icon menu options.
You can hover over the vertical (and horizontal) dashed lines of a table and when the cursors shows as two parallel lines with arrows you can click and drag the column (or row) markers to change the size of the table cells.
Note that you should not nest tables within tables as this will break the layout adjustment on mobile devices and small tablets.
Table Styles
We have added a number of predefined table styles to ensure consistency of layout and make it much easier to style a table.
Put the cursor in and cell in your table use the Table menu or toolbar icon to select Table properties. At the bottom of the popup window is a Class drop down list. Select one of the classes and click on OK to see the style applied in the editor. To remove a style use the same Table Properties popup and select the empty line at the start of the list of table classes.
there are basic styles for outlining each cell in black and underlining each row in grey, plus some coloured variations that supply coloured cells, borders and headers.
Colouring Tables and Cells
To add a background colour to a text paragraph (rather than just some selected text for highlighting) you must put the text into a table cell, then you can colour the cell. You can use the Table icon Table properties or an individual Cell -> Cell properties to set a background colour; you can also set row and column colours using their properties dialog window.
We have provided a simple way to select from a small number of standard colours for a row and or cell. Open the Row or Cell Properties dialog and at the bottom of that window use the Class drop down list to choose one of the named colours – they are all pale colours that will work with black text.
Alternatively, to set any background colour you must use a standard colour name or the Hexadecimal code (a # sign and six digits or letters such as #FFFFFF for white) and set this as the background colour for a cell or row property.
This X11 Colour Chart is a good simple guide to the standard colour names and their hexadecimal codes.
|
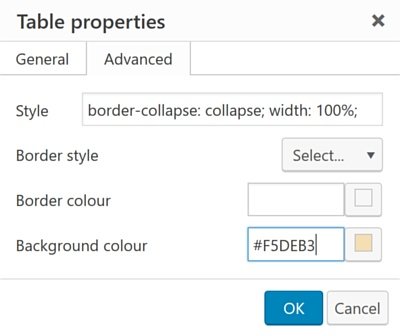
Once you have you colour code select the properties menu for your Table (cell, row or column) and click on the Advanced tab and enter the colour in the bottom Background colour box. Make sure you include the # sign and all six characters. You will see your colour shown next to the code #F5DEB3. Click on OK to apply the colour. |
 |


