
Images on other Web Sites
If your image is on another web page you can just copy the image URL (right click on the image in your browser and select copy image link/URL) and than paste that URL directly onto the page you are editing. This also works if you just copy the image: click on the picture to select it then eitehr press Ctrl-C or right click and select Copy Image, When you past the image onto your page (Ctrl-V or the Edit->Paste menu) the image link will be saved.
Clipboard images and local files
If your image is on the clipboard you will need to save it to a file first. Windows users: whenever you use Snip to capture an screen image it is automatically saved in your personal Pictures/Screenshots folder.
You will need to save your picture file to the Media Folders Library. We’re trying to keep the media library organised so we use the Media Library Folders for this rather then the simpler Media interface (these are the names on the black bar down the left hand side of the screen when you’re logged in). Be aware that the Media Library Folders plugin is horribly slow so you have to be patient, really patient – it can take 5 seconds or more to display the files in a media folder.
To upload a local image file to insert on a page:
- Go to the Dashboard
- Select Media Library Folders – > Folders & Files
- Wait for the view to download and you will see folders on the left
- Left click your target folder in the list to select it: click on the little triangle by a folder name to open it to see the contents
- When a folder is selected after a short while you will see a list of files in that folder
- On the left above the folder list there are three icons: the middle one (with the arrow pointing up) is the upload image action
- Click on this File Upload icon.
- In the right hand window click on the Browse button and find your picture file (or drag and drop it from the File Explorer)
- Click on Upload Image (and wait) and sometime (3-5 seconds) after the spinning cursor stops your file will be displayed.
Notes: You can create new folders using the left hand icon (folder symbol with a + sign) to create a new folder.
Adding an media image to your page
If you are not editing the page already:
- Go to the page you want to update
- Click on Edit Page in the black menu bar at the top of the screeen
To insert a picture that you have uploaded to the media library (see above)
- Put your cursor at the point where you ant the picture to appear
- Click on the Add Media button above the editor panel

- You will now see a display of the recently added images
- If you have just uploaded your image it will be the first one shown
- If you image is not present open the All Folders drop down list to browse to the media folder with your image, alternative use the All Dates drop down to show the month you uploaded the image
- Click on your image to select it
- Look at the bottom right of the popup window and select the size of the image you want to insert: the options will depend on the size of teh picture but you may see thumbnail, medium and full size (there may be others)
- Click on the Insert into Page button at the extreme bottom right of the media panel – be patient this can take 3-5 seconds to appear (on a good day)
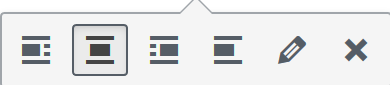
- If you want to centre or right align the image then right click on the image, press Esc to get rid of the popup menu and use the icon bar above the image to select left, center, right or simple image alignment. It is easier to align the image first then insert the text around it.
- You can use the edit pencil icon to select a different image size (thumbnail, medium etc.)
- If you edit the image and in the Image CSS class field replace the contents with wide (letter case sensitive) you can force your image to expand to the full width of the browser window. Normally an image will be restricted to the size of page or table cell containing the image.
- Ylou can manually change the image size using left click to select the image and at each corner there is a small white box (a handle), click (and hold down) this handle and drag the corner to resize the image.
Important: if you use the Upload Files feature on the Add Media Dialogue window you will not be able to select a folder to store your image as it wil always be placed in a folder for the current month and year. This would be acceptable for simple screen captures (like the ones on this page) but it would be better to store “important” pictures in a folder as described earlier.
Inserting images from the history group photo archive is decribed on the How To guide for the photo archive.